By A Beginner

"Every Expert Was Once A Beginner"

Protocols in Objective – C — July 6, 2015

Protocols in Objective – C

Protocols

As we have interfaces in Java and C#, and like abstract class in C++ similarly in Objective – C we have ‘protocols‘. A protocol is a list of methods that your confirming class promises to implement. It is not a real class, It can only declare methods and cannot hold any data. We can use Protocols to mark classes as having certain capabilities, like the ability to be copied, to be serialized and deserialized, or to act as a data source for some other class. Protocols make it possible for two classes distantly related by inheritance to communicate with each other to accomplish a certain goal. Thus protocols are used as an alternative to the subclassing.

Declaring Protocols

To declare a custom protocol we can use the below syntax.  A protocol can be declared in the ‘.h’ file of a class before the interface declaration.

@protocol MyProtocolName

//My protocol methods declaration

@end

You can mark a class as conforming to above protocol by declaring so in the class’s interface:

@interface SomeObject : NSObject 

@end

Here the class ‘SomeObject’  conforms to the protocol ‘MyProtocolName‘, thus the class ‘SomeObject’ must have to implement all the methods declared in the conforming protocol.

Protocols are not same as subclassing a class, where your class inherits number of methods and can choose to override some or all of them. Where as, conforming to the protocol means that you must implement all of the required methods that the protocol specifies.

To create an object conforming to the protocol we use the syntax as below:

@property(weak) id someConformingObject;

Here the object ‘someConfirmingObject’ confirming to ‘MyProtocolName’ is of type ‘id , so that it could be an object of any class at the run-time, but it is guaranteed that it implements the methods listed in the protocol.

Example for implementing custom Protocol:

Consider the two classes classA and classB , where classB contains the protocol called ‘MyProtocol‘. Here my classA has the strong reference to the object of classB and it conforms to the protocol ‘MyProtocol‘. In classB we have an object delegateObj of type id conforming to the protocol MyProtocol, this object holds the weak reference to the object of classA. The implementation for the methods in the protocols will be found in classA. Using the delegateObj in classB we can invoke the protocol methods in classA. i.e classB delegates its job to classB.

classA
//classA.h

@interface classA :NSObject 

@end

//classA.m
#import "classA.h"
#import "classB.h"

@implementation classA
-(void)initClassBObj
{
   classB *objB = [[classB alloc] init];
   objB.delegateobj = self;   //setting weak referenc of classA to classB object
}

-(void)myProtocolMethod
{
    //Delegated Task from classB
}

@end

classB
//classB.h

@protocol MyProtocol 
-(void)myProtocolMethod;
@end

@interface classB : NSObject
@property (weak) id delegateObj; //Holds the weak reference to classA object
@end

//classB.m

#import "classB.h"

@implementation classB

-(void)delegateTaskToClassA
{
 [self.delegateObj myProtocolMethod]; //This call delegates the task to protocol 
 //method in classA
}

@end

Other Details on Protocols:

Formal Protocols:

A formal protocol is a set of methods that must be implemented in any conforming class. This can be seen as a certification regarding a class, ensuring that it is able to handle everything that is necessary for a given service. A class can conform to an unlimited number of protocols.

Informal Protocols:

The informal protocol is not really a ‘protocol‘ ,instead it creates no constrains upon the code. But it is ‘informal‘ in nature and contributes for code auto documentation. This lets us to group methods by application field, so that it organize its classes consistently. We use the concept called ‘class category‘ to implement informal protocols.
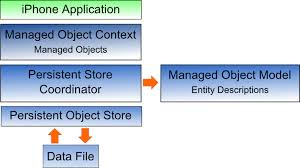
 To Know more refer:  Protocol


@property in Objective – C — June 28, 2015

@property in Objective – C

The keyword ‘@property’ in Objective-C can can be associated to a data member, to tell how the assessors can be automatically generated by the compiler. Which help us writing less code and saving the development time.  When the data member (instance variable) as a property ,it becomes available to the other classes to access or change its value using the accessors methods.

Declaring property

The properties can be declared in the @interface or the @implementation of the class with the appropriate attributes, but best practice is to declare them in the @interface of the class if it has to be accessed or changed by the other class. when declaring the property we can specify how the instance variables are exposed to other classes.

When you declare a property, you are telling other objects that getter and setter methods for accessing and changing one of the class’s instance variables exist.

Syntax for declaring the property in Objective-C:

@interface SomeClass : NSObject

@propert type name;
       //or
@property (attributes) type name;

@end

Property Attributes

Property attributes describe to other objects(and to the compiler) how the property behaves. The possible access specifiers are :

  • strong –   This property is a strong (owning) reference to an object. Using strong and weak properties controls whether the object referred to by the property stays in memory or not.
  • weak – This property is a weak (nonowning) reference to an object. When the object referred to by this property is deallocated, this property is automatically set to nil.
  • copy – This property’s setter copies any object passed to it, creating a duplicate object.
  • assign – This property’s setter method simply assigns the property’s variable to whatever is passed in, and performs no memory management.
  • readonly – This property does not generate a setter method, rendering the property read-only by other classes. (Your class’s implementation code can still modify the property’s variable, however.)
  • readwrite – This property generates both getter and setter methods. (This attribute is set by default—you need to explicitly use it only when overriding a superclass’s property.)
  • nonatomic – This property’s setter and getter do not attempt to get a lock before making changes to the variable, rendering it thread-safe.
  • getter=…, setter=… – Used when you want to change the default name of the accessors.                                               Eg:- @property (copy,getter=myGetter,setter=mySetter) NSObject *myObject;

 In a garbage-collected environment, retain is not different from assign. But in that case, the attributes __weak and __strong can be added.

Keywords @synthesize and @dynamic

@synthesize : This means that, unless developer already did it, the compiler should generate the accessors by it self, confirming to the constraints that were used in the property declaration. (With ARC all the properties are auto-synthesized and no need to explicitly synthesize the property explicitly in the @implementation)

@implementation A
@synthesize myProperty =_myProperty; //bind to "_myProperty" rather than "myProperty"
//(which does not even exist here)
@end

@dynamic : This means , it is up to the developer to provide the expected implementations of the accessor methods (a mere setter if read-only was specified when declaring the property; getter and setter otherwise).

If you do choose to mark a property as @dynamic, you need to implement the getter and setter methods yourself as shown below:

@implementation MyClass
@dynamic myProperty;
- (int) myProperty {
// this is the getter method for this property
      return 123;
}

- (void) setMyProperty:(int)newValue {
// this is the setter method for this property
}
@end

To understand more about @property refer:

  1. Encapsulating data

KVO In Objective – C — June 17, 2015

KVO In Objective – C

What is KVO ?(Key Value Observing)

KVO – Key Value Observing ,is the feature provided by COCOA which allows an object to register itself to be notified when another object changes the value of one of its properties. Here the controller would ask the model object for notification when the data changes , when the controller receives the notification from the model, the view is updated.

KVO simplify the process of registering for notifications ,and notifying any changes any objects that need to be told of the changes. Any property of an object can be observed , as long as that property’s name is key value coding compliant.

How to Register an Object For Change Notifications?

An object can register itself to be notified of the changes of its properties by the other object, by  telling the object to be observed the following : the object that should be notified when the property changes, the name of the property that should be observed, and the information the observer should be told about when the when change happens. Optionally , we can also include the pointer or object reference that should be passed to the method that is run when the change in the value of the property happens.

Eg: –

[aPerson addObserver:self
          forKeyPAth:@"personName"
             options:(NSKeyValueObservingOptionNew|NSKeyValueObservingOptionOld)
             context:nil];

In the above snippet we see that the object we add an observer for the ‘personName’ property of the object ‘aPerson’ to be observed by the ‘self’ object , which is notified with the old and new values of the property ‘personName’ of the ‘aPerson’ object.

Once the object has registered itself as the observer of another object, this object recieves the message ‘observeValueForKeyPath:ofObject:change:context:‘. This message has the following parameters:

  • The key path of the property that changed -[personName]
  • The object whose property changed -[aPerson]
  • An NSDictionary that contains information about the change -[change dictionary]
  • The context variable that was passed in when addObserver:forKeyPath:options:context: was called -[nil]

The change dictionary contains the different information dependin on what options wer passed in when the observer was added.

Eg:-

  • NSKeyValueObservingOptionNew :  then the dictionary contains the NSKeyValueChangeNewKey key, whose object is the value that the property has been set to.
  •  NSKeyValueObservingOptionOld : then the dictionary contains the  NSKeyValueChangeOldKey key, which can be used to get the previous value of the property.

Eg:-

The example for how an object can handle the aPerson object changing its personName property :

- (void)observeValueForKeyPath:(NSString *)keyPath
                      ofObject:(id)object
                        change:(NSDictionary *)change
                       context:(void *)context
{
       if ([keyPath isEqualToString:@"productName"]) {
           NSString* newPersonName = [change objectForKey:NSKeyValueChangeNewKey];
        // tell the appropriate view to update, based on the newPersonName variable.        }
}

How to Notify the Observers of the Changes?

Whenever implementing the key-value observation, the objects need to notify their observers when their properties change.

If the properties are declared using the ‘@property’ syntax and have compiler synthesize the accessor methods, then the object is automatically notify any registered observers when the setter methods are called.

If Objective-C properties syntax is not used for declaring the properties, or if you override the setter methods for a property , you need to manually notify the system of the changes that are being made.To do this, you call the willChangeValueForKey: and didChangeValueForKey: methods on the self object. This allows the key-value observing system to keep track of the previous and new values of a property.

Eg: – How to override the setter method for the personName property of aPerson object.

- (void) setPersonName:(NSString*)newPersonName {
          [self willChangeValueForKey:@"personName"];
          productName = newProductName;
          [self didChangeValueForKey:@"productName"];
}

To know more on KVO refer:

  1. Introduction to Key-Value Observing Programming Guide
  2. Understanding Key-Value Observing and Coding
KVC in Objective-C — April 29, 2015

KVC in Objective-C

 What is KVC?

KVC- Key Value Coding in Objective-C provides a mechanism for accessing the object properties indirectly. KVC makes use of strings to identify the objects properties ,rather than using the accessor methods or accessing them directly through instance variables.

KVC is the core technology of the binding technologies used by the controller layer (MVC), also a key mechanism behind the Core Data. By using KVC we can make the application scriptable, also using the KVC methods can simplify the applications code.

What are Keys and Key Paths?

Key is a string that identifies a specific property of  an object. Typically, a key corresponds to the name of an accessor method or instance variable in the receiving object.

Eg: For a "Person Object" the keys would be firstName,lastName,emailId,address,empId. and so on..

Key Path is string of dot separated keys that is used to specify a sequence of object properties to traverse. The property of the first key in the sequence is relative to the receiver, and subsequent key is evaluated relative to the value of the previous property.

Eg: In case of the person object again the key path 'address.street' would get the value of the address property of the receiving 'person' object , and then determine the 'street' property relative to the 'address' object.

How to get attribute values using Key – Value Coding?

We can easily get the attribute values using the method, ‘valueForKey: ‘ which return the value for the specified key, relative to the receiver. If there is no accessor or instance variable for the specified key, then the receiver sends the message valueForUndefinedKey:  to itself . The default implementation of this method raises an exception NSUndefinedKeyException; The sub classes can override this behavior.

Eg: NSString *fName = [person valueForKey:@"firstName"];
Here the string fName holds the value for the property 'firstName' of the object 'person'.

How to set attribute values using Key – Value Coding?

The method setValue:forKey: sets the value of the specified key, relative to the receiver, to the provided value.If the specified key does not exist, the receiver is sent a setValue: forUndefinedKey: message. The default implementation of this method raises an NSUndefinedKeyException ; however,subclasses can override this method to handle the request in a custom manner.

The method setValue:forKeyPath: behaves in a similar fashion, but it is able to handle a key path
as well as a single key.The setValuesForKeysWithDictionary: sets the properties of the receiver with the values in the specified dictionary, using the dictionary keys to identify the properties. The default implementation invokes setValue:forKey: for each key-value pair, substituting nil for NSNull objects as required.

One additional issue that you should consider is what happens when an attempt is made to set a non-object property to a nil value. In this case, the receiver sends itself a setNilValueForKey: message. The default implementation of setNilValueForKey: raises an NSInvalidArgumentException . Your application can override this method to substitute a default value or a marker value, and then invoke setValue:forKey: with the new value

Get Sample XCode Project showing use of KVC Here!

To know more on KVC refer:

1.Key Value Coding Programming Guide by apple.

2.Understanding Key-Value Observing and Coding

Blocks in Objective-C — April 18, 2015

Blocks in Objective-C

Blocks in Objective-C allows you to store the chunks of code in variables. Blocks can be assigned to a variable , passed to functions, and generally treated like any other value. Also the blocks can be called as the function, and they capture the state of the things as they were when the block was created.

A simple block would look something like this :

int i = 5;
void (^someCode)() = ^{
NSLog(@"The value of i is %i", i);
};

We can invoke the above block like a function :

someCode();  //This prints  “The value of i is 5”

Here we see that the value of the variable ‘i‘ was captured during the creation of the block , hence it its value is 5 when used within the block. Thus when a variable outside a block is referenced within that block, the value of that variable at the moment of the block’s creation is captured and is available for the block’s code to use.

Blocks allow you to defer the execution of something until you need it to actually happen. This makes them very useful in the context of animations (“when the animation’s done, do this thing”), for networking (“when the download’s done, do something else”), or in general user interface manipulation (“when I return from this new screen, do some work”). They also allow you to keep related pieces of code close together. For eg:- using Blocks we can avoid writing a method to filter the array elements having prefix “Apple” as below.

// Filter an array of strings down to only strings that begin with the word
// "Apple"
NSPredicate* filterPredicate = [NSPredicate predicateWithBlock:^(id anObject) {
NSString* theString = anObject;
return [theString hasPrefix:@"Apple"];
}];
NSArray* filteredArray = [someArray filteredArrayWithPredicate:filterPredicate];

 Blocks Syntax

[Return Type] (^ [Variable Name]) ([Parameters]);

With reference to the above syntax we can define the block variable as shown:

  • A simple block which returns no value and takes no parameters will be defined in the following ways
void(^myBlockVariable)(void);      
void(^myBlockVariable)();    //Since the block takes no parameters
  •  A block block which takes input parameters will be defined by adding the parameters in the paranthesis at the end –
void(^myBlockVariable)(BOOL booleanParameter, NSString* objectParameter);

Once a block variable has been declared, it must have a block assigned to it before it can be called.

void(^myBlockVariable)(BOOL parameter);   //Declaration of the block variable
myBlockVariable = ^(BOOL parameter) {    // Assigning Block to the block variable   
// Code goes here.
};
                               
                                         ---OR---
void(^myBlockVariable)() = ^{ //Declaration and initialization of a block variable 
// Code goes here.                  //This block takes no parameters
};

Once we have defined the block it can be called as a we invoke the function like : myBlockVariable();

Using Blocks as parameter in Methods

Since the block in objective C is treated as any other value and assigned to a variable ,it can be passed as the parameter to a function. This is a key feature of the block ,since it allows the caller of the methods to provide the code at the moment they call the method.

The method accepting the block as a parameter can be declared as below:

- (void) someMethod:(void(^)(BOOL aParameter)) handler;

The implementation of this method would be:

- (void) someMethod:(void(^)(BOOL aParameter)) handler {
// Call the passed-in block:
handler(YES);
}                                        

We can call the above method like this

[anObject someMethod:^(BOOL aParameter) {
// The called method will call this method
}];

We can simplify the deceleration of the block variable by defining the block type , this reduces the amount of typing the code to declare a block variable and using it. Also it makes sure that all the block we use are of the same type.

// somewhere in your source code, outside of a function or method:
typedef void(^ABlockType)(BOOL aParameter);

// and later, in a function:
ABlockType myBlock = ^(BOOL aParameter) {
// do some work
};

We can use the above declared block as the method parameter as shown here:

- (void) someMethod:(ABlockType)handler; //This looks much tidier...!

Be Careful when using blocks

When a block is created, it is stored on the stack memory. So when we create a block, store it in a instance variable of the method , and then if we return from this method the block is removed from the memory but the instance variable still points to where it was. Thus on calling this block now would crash as the block no longer exists. This problem can be solved by copying the block to the heap , and making it to be in the memory as long as needed.

// myBlockProperty is a property of this class that can store the block.
void(^myBlockVariable)() = ^{
// code goes here
};
self.myBlockProperty = myBlockVariable; // INCORRECT! The block
// won't exist after this function returns, and calling it will crash.
self.myBlockProperty = [myBlockVariable copy]; // SAFE. The
// block will be copied and stored on the heap, and stick around.

Modifying the Local variables from within the block

Since the block captures the value of the variables that was during the creation of the block. In order to modify the value of this variable from within the block, we must declare the variable marked with the __block keyword.

__block int i = 0;                    //Declaring the variable with __block keyword
void(^myBlock)() = ^{                 // A simple block which modify the value of 'i'
i = 4;
};
myBlock();
NSLog(@"i is now %i", i);             // will print "i is now 4"
References:

Books: Learning Cocoa with Objective-C ,By -Jon Manning, Paris Buttfield-Addison, and Tim Nugent.

To know more:
Categories in Objective-C — April 4, 2015

Categories in Objective-C

Objective-C provides a feature for defining the new methods for an existing class even for the class whose source code is not available to you. One can make use of categories when their is a need to add new methods to the predefined classes such as COCOA classes-‘NSString etc.’ without sub-classing it .

A category is a group of methods for a class which are available to all through the class and can be used as the methods declared in the interface of the method. This helps to split up the class having numbers of methods in to several interface and implementation files, which helps in maintaining the large projects.The category name indicates that the methods are the additions for the class defined earlier and not a new class.

Consider a class ‘car’

// car.h

#import <Foundation/Foundation.h>

@interface Car : NSObject

-(void)startEngine;

-(void)applyBreak;

@end

Now consider the above ‘car’ class for which we want to add some new methods/capabilities (maintenance),we can do this by using categories as below.

// car+Maintenance.h

#import “car.h”

@interface Car (Maintenance)

-(void)maintainanceTyre;

-(void)maintainanceEngine;

@end

The implementation file for this category ‘maintenance’ would be as below:

// Car+Maintenance.m

#import Car+Maintenance.h

@implementation Car (Maintenance)

-(void)maintainanceTyre                                 //method 1 defination

{

}

-(void)maintainanceEngine                                 //method 2defination

{

}

@end

Now the methods ‘-(void)maintenanceTyre’  &  ‘-(void)maintenanceEngine’  will be available to all the objects of the ‘car‘ class.

#import <UIKit/UIKit.h>

#import Car.h

#import Car+Maintenance.h”                                      //category 

int main(int argc, char * argv[]){

@autoreleasepool {

Car *car1 = [[Car alloc] init];

//using methods from the class ‘car’

[car1 startEngine];

[car1 applyBreak];

//using additional methods from the category maintenance for the car1 object

[car1 maintenanceTyre];

[car1 maintenanceTyre];

}

}

Download : Sample XCode project on categories and extension Here!

iOS: To Draw Poly line on apple maps to show directions from Source to Destination in your app. — January 24, 2015

iOS: To Draw Poly line on apple maps to show directions from Source to Destination in your app.

Making use of the mapkit and core location frameworks we can easily draw a poly line indicating the direction from the given source lat,long to destination lat,long . We can set the source and the destination point coordinates  and create the source and destination map items by using the below code.

//To set the source place mark
MKPlacemark *source = [[MKPlacemark alloc]initWithCoordinate:CLLocationCoordinate2DMake(37.333144, -122.021509) addressDictionary:[NSDictionary dictionaryWithObjectsAndKeys:@"",@"", nil] ];

//To create the source map items
 MKMapItem *srcMapItem = [[MKMapItem alloc]initWithPlacemark:source];

Similarly we use same to set the destination place mark and map item using,

  MKPlacemark *destination = [[MKPlacemark alloc]initWithCoordinate:CLLocationCoordinate2DMake(37.331741, -122.030333) addressDictionary:[NSDictionary dictionaryWithObjectsAndKeys:@"",@"", nil] ];

 MKMapItem *distMapItem = [[MKMapItem alloc]initWithPlacemark:destination];

We can now get the direction between the source and destination bu making the MKDirectionRequest  as shown below.

MKDirectionsRequest *request = [[MKDirectionsRequest alloc]init];
[request setSource:srcMapItem];
[request setDestination:distMapItem];
request.requestsAlternateRoutes = YES; //for alternate routes from src to destination.
[request setTransportType:MKDirectionsTransportTypeAutomobile];

The response of the MKDirectionRequest contains the direction details .

MKDirections *direction = [[MKDirections alloc] initWithRequest:request];
[direction calculateDirectionsWithCompletionHandler:^(MKDirectionsResponse *response, NSError *error) {
     NSLog(@"response = %@",response);  //Contains the calculated direction information from source to destination.

}];

Now we have the directions we make use of the below map view delegate method to draw the poly line from source to destination points on the map.

- (MKOverlayView *)mapView:(MKMapView *)mapView viewForOverlay:(id)overlay {
     if ([overlay isKindOfClass:[MKPolyline class]]) {
        MKPolylineView* aView = [[MKPolylineView alloc]initWithPolyline:(MKPolyline*)overlay] ;
        aView.strokeColor = [[UIColor colorWithRed:69.0/255.0 green:147.0/255.0 blue:240.0/255.0 alpha:1.0] colorWithAlphaComponent:1];
        aView.lineWidth = 10;
        return aView;
     }
     returne nil;
}

We can also make use of the  viewForLocation: map view delegate method to change the appearance of the map pins of the source and the destination points on the map.

-(MKAnnotationView *)mapView:(MKMapView *)mapView viewForAnnotation:(id<MKAnnotation>)annotationPoint{
     static NSString *annotationIdentifier = @"annotationIdentifier";
     MKPinAnnotationView *pinView = [[MKPinAnnotationView alloc]initWithAnnotation:annotationPoint reuseIdentifier:annotationIdentifier];
      if ([[annotationPoint title] isEqualToString:@"Source"]) {
            pinView.pinColor = MKPinAnnotationColorRed;
      }else{
            pinView.pinColor = MKPinAnnotationColorGreen;
      }
       return pinView;
}

Download the sample code here: GitHub Link

iOS : Get Current Location Latitude and Longitude —

iOS : Get Current Location Latitude and Longitude

To get a current location latitude and longitude values using Core Location framework.

1. Include the core location framework in to your project by going to Link Binaries With Libraries in your projects Build Phases.

2. Then make your view controller to conform to CLLocationManagerDelegate in viewcontroller.h file as below.

#import <CoreLocation/CoreLocation.h>
@interface TLViewController : UIViewController<CLLocationManagerDelegate>{
      CLLocationManager *locationManager;
}

3. Initialize the location manager object and call the method CurrentLocationIdentifier as below.

locationManager = [[CLLocationManager alloc] init];
 [self CurrentLocationIdentifier]; // method prints the current location latitude and longitude values.
-(void)CurrentLocationIdentifier{
      //---- For getting current gps location
      locationManager = [CLLocationManager new];
      locationManager.delegate = self;
      locationManager.desiredAccuracy = kCLLocationAccuracyBest;
      [locationManager startUpdatingLocation];
}

4. The location manager delegates fetches the locations latitude and longitude values as and when it is  updated and prints it in the log.

- (void)locationManager:(CLLocationManager *)manager didUpdateToLocation:(CLLocation *)newLocation fromLocation:(CLLocation *)oldLocation{
    NSLog(@"didUpdateToLocation: %@", newLocation);
    if (currentLocation != nil) {
         NSLog(@"%.8f-%.8f",currentLocation.coordinate.longitude,currentLocation.coordinate.latitude);
    }
}

Download X-Code Project Here!

iOS: Core Data Framework — January 20, 2015

iOS: Core Data Framework

Core Data is a framework by apple which deals with the model layer of the Model-View-Controller design pattern in the application. It was introduced in Mac OS X 10.4 Tiger and iOS with iPhone SDK 3.0. It provides the optimized solution for saving the objects in to the memory and fetching it from the storage when needed. Core Data is used as the in memory store for the application as it provides generalized and automated solutions to common tasks associated with object life-cycle and object graph management, including persistence on disk.

It takes advantage of information provided in the model and runtime features not typically employed in application-level code. Moreover, in addition to providing excellent security and error-handling, it offers best memory scalability of any competing solution.

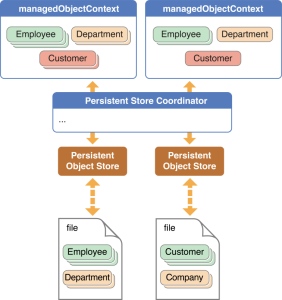
Core Data Framework is made up of core data stack . It is the ordered collection of objects from a managed object context, through a persistent object store coordinator, to a persistent store or collection of persistent stores. A stack is effectively defined by a persistent store coordinator ,there is one and only one per stack. Creating a new persistent store coordinator implies creating a new stack.

CoreData1

Fig:1.0_ Core Data Stack Contents.

In Core Data the NSManagedObjectModel, the NSPersistentStoreCoordinator, and the NSManagedObjectContext all of these on the stack work together to allow a program to retrieve and store NSManagedObject instances. In most situations, the program will access the NSManagedObjectContext only once the stack has been created. It is possible to access the other components of the stack, but it is rarely necessary.

Managed Object : Model objects that tie into in the Core Data framework are known as managed objects .It is an instance of NSManagedObject or a subclass of NSManagedObject. After creation it should be registered with a managed object context.

Managed Object Context : When the objects are fetched from the persistent store, they are brought in to managed object context where they form an object graph (or collection of object graphs). You can then modify those objects however you like. Unless you actually save those changes, however, the persistent store remains unaltered. It is an instance of NSManagedObjectContext. An NSManagedObjectContext object represents a single “object space” or scratch pad in an application. The context is a powerful object with a central role in the life-cycle of managed objects, with responsibilities from life-cycle management (including faulting) to validation, inverse relationship handling, and undo/redo.

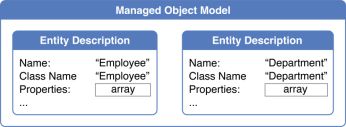
Managed Object Model : An object that is an instance of NSManagedObjectModel. An NSManagedObjectModel object describes a schema, a collection of entities (data models) that you use in your application. It uses a private internal store to maintain its properties and implements all the basic behavior required of a managed object.

Img1Fig:1.1_Managed Object Model

Persistent Object Store Coordinator : An object that is an instance of NSPersistentStoreCoordinator. A coordinator associates persistent stores and a configuration of a managed object model and presents a facade to managed object contexts such that a group of persistent stores appears as a single aggregate store.

Persistent Object Store : A repository in which objects may be stored. A repository is typically a file, which may be XML, binary, or a SQL database. The store format is transparent to the application. Core Data also provides an in-memory store that lasts no longer than the lifetime of a process.

img2

Fig:1.2_Advance Persistence Stack

About Persistent Documents :

We can create and configure the persistence stack programmatically. In many cases, when we simply want to create a document-based application that is able to read and write files. The NSPersistentDocument class is a subclass of NSDocument that is designed to let you easily take advantage of the Core Data framework. By default, an NSPersistentDocument instance creates its own ready-to-use persistence stack, including a managed object context and a single persistent object store. There is in this case a one-to-one mapping between a document and an external data store.

The NSPersistentDocument class provides methods to access the document’s managed object context and provides implementations of the standard NSDocument methods to read and write files that use the Core Data framework. By default you do not have to write any additional code to handle object persistence. A persistent document’s undo functionality is integrated with the managed object context.

To Fetch Stored Data :

To retrieve data from a persistent store like a database SELECT operation. The result of a fetch is the creation of a collection of managed objects that are registered with the managed object context used to issue the request.

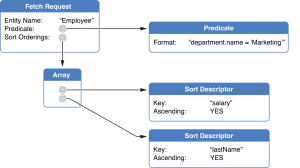
Fetch Request : An instance of NSFetchRequest that specifies an entity and optionally a set of constraints, represented by a NSPredicate object , and an array of sort descriptors (instances of NSSortDescriptor). These are similar to the table name, WHERE clause, and ORDER BY clauses of a database SELECT statement respectively. A fetch request is executed by being sent to a managed object context.

fetch_request_2x

Fig:1.3_Demonstrating Fetch Request

To Insert Data :

The process of adding a managed object to a managed object context so that the object becomes part of the object graph and will be committed to a persistent store. Typically “insertion” refers only to the initial creation of a managed object. Thereafter, managed objects retrieved from a persistent store are considered as being fetched.

A managed object must be inserted into a managed object context before it is considered part of the object graph. A managed object context is responsible for observing changes to managed objects (for the purposes of undo support and maintaining the integrity of the object graph), and can only do so if new objects are inserted.

Features :

  • Core Data provides built-in management of undo and redo beyond basic text editing.

  • Core Data manages change propagation, including maintaining the consistency of relationships among objects.

  • It supports faulting which helps in reducing the memory over head of the program by lazily loading objects and also supports copy-on-write data sharing .

  • Core Data’s managed objects extend the standard key-value coding (KVC) validation methods that ensure that individual values lie within acceptable ranges so that combinations of values make sense.

  • In addition to synthesizing key-value coding (KVC) and key-value observing (KVO) compliant accessor methods for attributes, Core Data synthesizes the appropriate collection accessors for to-many relationships.

  • It also provides an option to integrate the application’s controller layer to support user interface synchronization, by providing the NSFetchedResultsController object on iOS, and integrates with Cocoa Bindings on OS X.

  • Automatic support for storing objects in external data repositories.

Conclusion :

Using core data reduces the amount of the code to be written to support the model layer of the application as it provides the various features to manage the data objects. It also eliminates the optimization of the code for managing data in the application as the framework has been highly optimized over several releases so far.

It takes advantage of information provided in the model and runtime features not typically employed in application-level code. Moreover, in addition to providing excellent security and error-handling, it offers best memory scalability of any competing solution.

Core Data is not a relational database or a relational database management system (RDBMS). It provides an infrastructure for change management and for saving objects to and retrieving them from storage thus behaving as an in memory store of the application. It uses the SQLITE as one of its persistent store .

References:

  1. https://developer.apple.com/library/mac/documentation/Cocoa/Conceptual/CoreData/cdProgrammingGuide.html#//apple_ref/doc/uid/TP30001200-SW1

  2. https://developer.apple.com/library/mac/documentation/Cocoa/Conceptual/CoreData/Articles/cdBasics.html#//apple_ref/doc/uid/TP40001650-TP1

  3. https://developer.apple.com/library/mac/documentation/Cocoa/Conceptual/CoreData/Articles/cdGlossary.html#//apple_ref/doc/uid/TP40001651-TP1

iOS:To seprate group of ANAGRAMS in an array — January 17, 2015

iOS:To seprate group of ANAGRAMS in an array

Here is the code for grouping and printing the set of anagrams in an array.If any better solutions please Comment.


- (void)viewDidLoad
 {
 [super viewDidLoad];
 //self.view.backgroundColor=[UIColor blueColor];
 // Do any additional setup after loading the view, typically from a nib.
 NSString *tmpStr1;
 NSString *tmpStr2;
 NSMutableArray *newArr=[[NSMutableArray alloc] init];
 BOOL Var=NO;
 int i,j;
 NSArray *arr1=[[NSArray alloc] initWithObjects:@"star",
 @"rats",
 @"arts",
 @"car",
 @"rac",
 @"arc",
 @"abcde",
 @"bcdea",
 @"cdeab", nil];
 for (i=0; i<[arr1 count]; i++) {
 for (j=i+1; j<[arr1 count]; j++) {
 tmpStr1=[arr1 objectAtIndex: i]; //star
 tmpStr2=[arr1 objectAtIndex:j]; //rats
 if ( tmpStr1.length == tmpStr2.length) { //4==4
 [newArr addObject:tmpStr1]; //newArray=[star]
 for (int k=0; k<tmpStr2.length; k++) {
 //Get the letter by letter in tmpStr2
 NSString cmpStr=[NSString stringWithFormat:@"%C",[tmpStr2 characterAtIndex:k]]];
 if ([tmpStr1 rangeOfString:cmpStr.location == NSNotFound) {
 Var=NO; //Characters in tmpStr2 not found in tmpStr1
 } else {
 Var=YES; //Characters in tmpStr2 found in tmpStr1
 }
 }
 //if all the letters in string tmpStr2 are present in string tmpStr1
 if (Var) { 
 //add the second string i.e. tmpStr2 to the array newArr
 [newArr addObject:tmpStr2]; 
 }
 }
 else
 {
 i=j; 
 //remove the duplicate strings in the array newArr
 //print the anagram set to log
 NSLog(@"NewArr::>%@",[[NSSet setWithArray:newArr] allObjects]); 
 //remove the objects in the array for the next set of anagrams
 [newArr removeAllObjects]; 
 //Controll goes to this line::> for (j=i+1; j<[arr1 count]; j++)
 continue; 
 }
 }
 }
 NSLog(@"Arr2::%@",[[NSSet setWithArray:newArr] allObjects]);
 NSLog(@"Arr1::%@",arr1); //To print the original array
 }


Find on Git: Here!